Growing Season
Building a raised-bed garden.
Garden beds: they had been on my honey-do list for the past five summers, but I always seemed to find something more fun to occupy my warm days. Finally, I had a free weekend last fall, and figured it was the perfect opportunity to build a couple of raised beds. There are many benefits to raised beds: fewer weeds, warmer soil to extend the growing season, and better drainage, just to name a few.
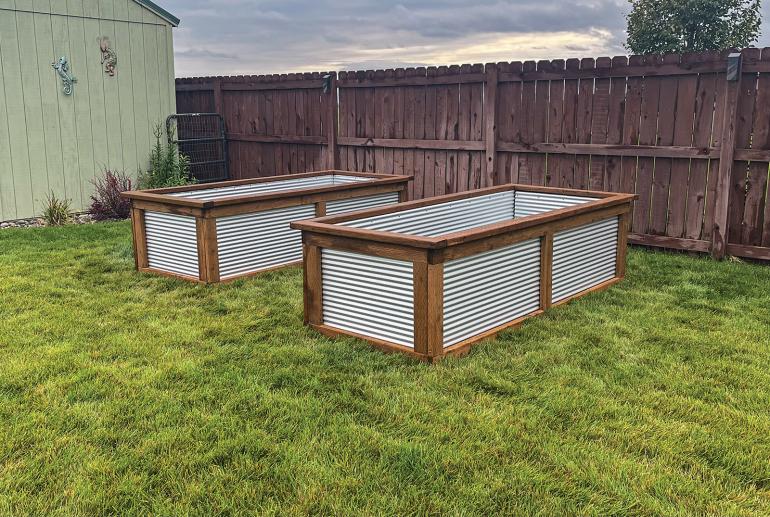
The design I went with was simple, utilizing corrugated sheet metal and pressure-treated 2x4s. Each box was going to be eight feet long and three feet wide (the width should be less than four feet so you can reach the middle of the bed easily). Here’s the list of materials needed:
- (2) 12’ x 2’ pieces of corrugated sheet metal
- 11 pressure-treated 2’ x 4’ boards, 8 feet long
- Box of 1-inch metal roofing screws with washers
- Box of 2.5-inch wood screws
Once I had the materials in-hand, the first step was to put the sides together in my garage. First, I cut the 2x4s into ten, 19-inch vertical supports and four, 36-inch horizontals for the short sides. The long sides were eight feet, so they didn’t require any cuts. I then laid two eight-foot boards on the floor and angle-screwed the 19-inch supports in—two at the edges and one in the middle. For the short sides, I used two supports on the edges only.
Using tin snips, I cut the sheet metal, the long sides at 93 inches and the short sides at 35 inches. I then attached the sheet metal to the prebuilt sides with the roofing screws. On the long sides, I left 1.5 inches of space between the vertical edges of the frame and the sheet metal. On the short sides, I left a half-inch. These spaces are important for putting the sides together. Also make sure that the sheet metal curves into the wood on the top of each side. If not, the metal will stick out awkwardly from the wood.
With the four sides complete, I moved everything out to where I wanted the beds to go, picking a place that gets full sun throughout the summer. I squared everything, with the short sides fitting into the 1.5-inch spaces I had left.
Finally, I placed 2x4s flat across the top, with about a half-inch hanging over inside to cover the sharp edges of the corrugated sheet metal. It took 93-inch boards on the long sides, and 43-inch boards on the short sides. In addition to the protection these boards provide, they’re also a nice place for your drink while gardening.
Once the bed was done, I dug out the sod underneath to get the bed on dirt, and placed the sod, grass-side down, on the bottom of the bed to fill in some space. Then, for the last several grass cuttings of the year, I dumped the trimmings into the bed. Between the grass trim and the sod, the bed was roughly half full when spring rolled around. I filled the remainder with topsoil, and I’ll (hopefully) start growing vegetables this spring.


